
|
Home |
| Clutch and Flywheel | ||
This write up is intended to
be a supplement to the
information you can find in
the factory 968 manuals and
in the 944 clutch change
procedures available at
http://www.tech-session.com/
or
http://www.clarks-garage.com/
and other places. This is
not a complete how-to (who
knows what I have forgotten)
but things I thought might
be helpful to other 968
owners attempting the same
job. I found the factory
manual leaves out a lot of
detail and does not even
touch on the changing the
flywheel or rear main seal,
the 944 procedures don't
directly apply either. I'm
not a factory trained
mechanic, so use this
information at your own
risk. Remember to be safe
and have your car properly
supported before getting
under it.
  First off, if you are just changing the clutch and pressure plate be thankful you have a 968 because it is simple when compared to what is involved in a 944 clutch job. Here are the basic steps: -Raise the car to a height where it is comfortable to be under there on a creeper, be extra sure the car will not fall on you even if the car falls off the jack stands. -Disconnect the battery. -Remove the under engine belly pan (you are later going need to turn the crank at the front of the engine) -Remove the oxygen sensor from the exhaust pipe. It is on top of the pipe just to the rear of the starter. -Remove the center section of the exhaust system. This is the section with the Cat and as such is a little heavy. I found it helpful to soak the 6 header to exhaust bolts with penetrating oil the night before. They broke free with no problem. -Remove the starter. I placed it on box under the car so I did not have to remove the cables. -The 968 manual mentions removing heat shields. My car did not have these and it didn’t look like it ever did. -Remove the clutch access cover on the side of the bellhousing. You will need some socket extensions and universal joints to get at the top bolts. Once the cover is off you will see the pressure plate. -Loosen the release fork shaft retaining bolt, which is just above the starter mount on the bellhousing. -Remove the release fork shaft. This is described well in the 944 procedures. I threaded one of the old exhaust bolts in and attached vise-grips to the bolt. You really need to hammer on the vise grips and the shaft will slowly come out. Using a longer bolt may help. You can leave the release fork loose in the bellhousing until the clutch is out. -Remove the small rubber plug on the torque tube just aft of the bellhousing. -Get a socket on the crank at the front of the engine and rotate until you see the allen bolt thru the hole in the torque tube. -With an 8mm allen, remove this bolt. I tried just loosening it but I couldn't slide the front piece of the drive shaft back far enough until I completely removed this bolt. -The 968 has a two-piece driveshaft. The small front portion will slide back over the splines of the rear portion. I used a screwdriver thru the allen hole in torque tube to push the front shaft back and out of the clutch plate. Once it is out of the clutch it can be slid farther back by hand. It will slide all the way back until it is clear of the clutch guide sleeve. -Remove the two small bolts securing the guide sleeve. -Mark the relationship between the flywheel and pressure plate so that it can later be reassembled in the same configuration. -Evenly loosen the nine bolts holding the pressure plate to the flywheel. You will need an 8mm cheesehead or "triple-square" socket to get these out. (This is the same tool that is used on the CV joints.) You will only be able to reach two or three bolts at a time. Rotate the crank and work your way around until you get them all. Then, do it again as you remove the bolts. -The clutch plate, pressure plate and guide sleeve should now slide out the side of the bellhousing. The release fork also comes out at this time. -Inspect the flywheel surface for scoring or wear. If there are any issues this is the time to remove it and have it surfaced. Mine looked fine but I wanted to try a lighter weight flywheel, so out it came. -If you are leaving the flywheel in, replace the pilot bearing in the flywheel. Again, this is described in the 944 procedures. I installed a new bearing in the new flywheel while it was out of the car. -Replace the needle bearings in release fork. I used a socket and hammer to drive out the old bearings. I used a vise to press the new bearings in. I had no problems with this step.   Now if you are going to remove the flywheel and rear main seal, this is where you wish you had a 944 and the whole bellhousing was out of your way. These steps caused me the most pain. If you are just doing the clutch you can skip ahead. If you are taking out the flywheel it is also a good opportunity to replace the rear main seal on the crank. I replaced the 27 lb. dual mass flywheel with an 11 lb. Fidanza aluminum flywheel purchased through Paragon Products. I also went with the Sachs sport clutch, which has a pressure plate with a higher clamping force. Be sure to buy a good quality 12mm 12 point cheesehead or 'triple square' allen to remove the flywheel bolts. Buy one without the socket attached or make sure it is very short. I first bought one from the local NAPA store. It was too long when used with a socket wrench so I used a dremel tool to cut off a couple of inches the allen shaft. The guide sleeve mounting brackets are very close to the flywheel. As such, there is only enough room to get at one bolt at a time. You will also need a flywheel lock to secure the flywheel so you can break the bolts free. The procedure is like this: install flywheel lock, break free the one bolt you can reach, remove the flywheel lock, turn the crank a little, reinstall the flywheel lock and do the next bolt. This worked great for 8 of the 9 bolts. Of course one of them stripped. You want to be double sure the allen is fully inserted into the bolt head and that your breaker bar is square with the bolt. The points on the NAPA tool wore down which caused the head on the bolt to strip. I later purchased the Snap-On version which is made of much harder steel (and of course is much more expensive). I should have done that in the first place. I also had to cut off a couple inches of the Snap-On tool. Now, how to get the stripped bolt off? I first tried putting flats onto the sides of the bolt with the dremel tool and using vice grips. That didn’t work. I thought I was going to have to drill the head off, but Bob Villa saved the day. I bought a 'Bolt Out' kit from Sears, which removes stripped bolts. The 'Bolt Out' socket grabbed on the head and the bolt came right out. Whew. Use a screwdriver and carefully pry the flywheel off. Be careful as the flywheel is heavy - so be ready to 'catch' it. Next was the rear main crankshaft seal. Mine wasn’t leaking but I wanted to change it since I was all the way in there. There is a slot in the block at the bottom of the seal. This is where you can insert a screwdriver and pry the seal out. The problem is only a very short screwdriver can get a straight angle on the slot because the bellhousing is in the way. So you have to go at it on an angle. I had very little success getting any leverage against the seal. I also tried seal picks but the seal wouldn’t budge. It is in there tight. You also have to be careful not the mar the block or the crank as it can lead to future oil leaks. I finally bought a really long stiff screwdriver from Sears. At the slot in the block, I used a hammer to punch the screwdriver through the metal ring of the seal, careful not to go all the way thru to the crank. I then forcefully pried the seal out with the screwdriver. There may be a proper tool for this job but I don’t know what it is.  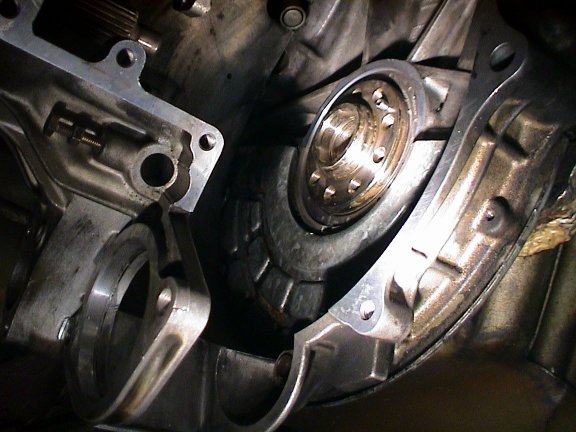 Putting the new seal in proved to be a challenge as well. The seal needs to be evenly driven in and seated, but there is no room to use a hammer on a driver - even if you had a proper 944 seal setting tool. I ended up making my own tool, which is basically a small press. It is made out of a 6" bolt, washers, nuts, two 4"x4"x1/4" steel plates and a section of a 3" PVC plumbing connection. The PVC was not quite the right diameter so I cut it and inserted a nut to slightly increase the diameter. Again, there may be a real tool for this but I don’t know about it and one is not mentioned in the 968 manuals. The press attaches to the guide sleeve mount and the other end of the bolt goes into the recess at the end of the crank. I then used an open-ended wrench to slowly turn the nut and push the steel plate against the PVC against the seal. It worked great. I was really stumped before I thought of it.     The new flywheel would not slide onto the pin by hand. Luckily, I could just reuse the press with a shorter bolt and no PVC piece to push the flywheel on to the crank pin. The new flywheel bolts can now be hand tightened. Use the flywheel lock and a torque wrench to tighten the bolts - evenly working your way around in a similar fashion as used when loosening the bolts.   If you are just doing the clutch you can start reading again here. -Attach the new release bearing to the new pressure plate. This is easy and is also described in the 944 procedures. Use your old pressure plate as an example. -Loosely place the release fork in the bellhousing. You won’t be able to fit it in later. -Place the clutch plate, pressure plate and guide sleeve together in the same configuration as they came out of the car. Use the proper lube on the splines. -Check your markings on the flywheel and old pressure plate and align the new pressure plate with the flywheel in the same configuration. -Hand tighten the 9 pressure plates bolts. Be sure to use new hardware. -Re-attach the guide sleeve to the brackets with the two small bolts. -Slide the front piece of the drive shaft into the clutch. You may have to wiggle it a bit. A clutch alignment tool would normally be used before this step, but there is no room for it since the driveshaft and bellhousing are right there. Once the splines are aligned you can use a screwdriver to pry the driveshaft forward. You do this thru the hole in the bottom of the torque tube. -Rotate the crank until the allen bolt can be reinserted into front drive shaft piece. Visually inspect the hole before inserting the bolt. If you can see the splines of the rear drive shaft piece the front drive shaft has not been pushed far enough forward. -Evenly torque down the pressure plate bolts. -Align the release fork on the release bearing and clutch slave cylinder. -Re-insert the release fork shaft and make sure the release fork moves freely. -Tighten the release fork retaining bolt onto the flat section of the shaft. -Re-attach the bellhousing cover -Re-install the starter -Re-install the exhaust and oxygen sensor -Re-install belly pan -Connect the battery -Take the car off the stands You’re done! A lot of these steps may not be clear until you actually do the job. I could probably redo this job in ¼ the time if I had to do it again. The clutch portion was relatively easy. The flywheel and seal were a challenge. You may have better luck. | ||
| THIS PAGE WAS LAST UPDATED ON JANUARY 5TH, 2003. | TODAY IS |